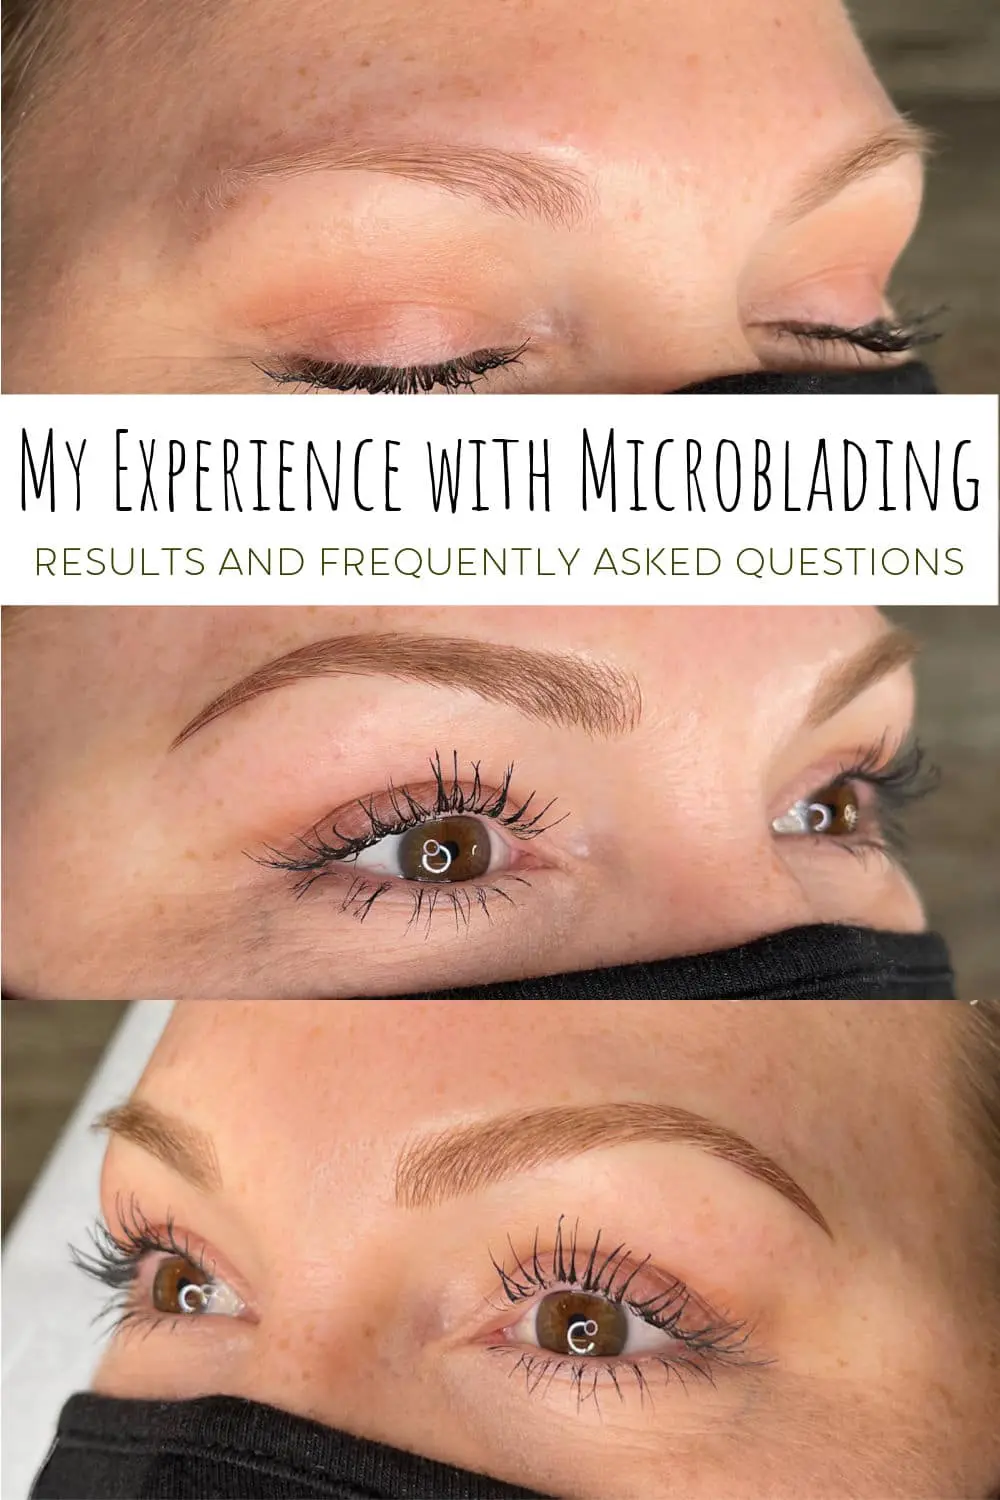
I tossed around the idea of microblading for a long time. Microbladed brows appealed to me so much because my natural brows are blonde, thin and have no tail (shout out to my teenage years and overplucking). I loved the idea of waking up and having my brows actually visible and structured. But I also wanted to make sure my brows looked as natural as possible. After looking at many artists and not loving what I saw, someone recommended Vera of Vera Artistry. I watched her stories on Instagram and saw all her amazing pictures and I was convinced! I finally went for it in February of this year, so I wanted to share my experience with microblading, microblading results, and answer some frequently asked questions I got on my Instagram account.

Microblading FAQ
What is the Microblading Process?
My experience with microblading started with a consultation with the artist. During this first visit, I was asked what I envisioned for my brows. I wanted my brows to be more structured and defined with some thickness and more of a tail as my natural brows ended about midway through. Vera first mapped out the shape of my brows she thought would look best and then a color that would be the best match. Since my brows were more on the blonde side, Vera explained that my color would look a little red for the first week or so but it would fade to a taupe like color that would match best. She was 100% right about this. I was still a little worried at how red they were when they started to heal but they healed up to the perfect color. Once she was done, she allowed me to look so I could make sure I was comfortable with the direction we were going.

From there, she numbed my brows with a lidocaine cream for about 10 minutes. I’m not gonna lie, the first go around was more painful than I anticipated. Not terrible by any means but I definitely felt it and was happy when the initial cuts were done.
After the first round, she once again numbed my brows and this time they were much more prepared for the 2nd go through. She explained that the lidocaine was better able to penetrate my skin since the initial cuts were made. After that it was smooth sailing and my new brows were ready to go in about an hour. My brows were slightly sore after but just a little. It was more like the feeling after your get your brows threaded or waxed. The feeling was gone after a couple hours.

I had my second appointment 6 weeks later. At this appointment, Vera looked to see how my brows healed and where additional color or strokes were needed. Similar to the first time, she mapped out what she would be doing and once approved, she numbed my brows to start making strokes. This time there was little to no pain or discomfort when she went over my brows and the appointment lasted about an hour.

Microblading Healing Process
I was given an after care card that explained the timeline of what to expect. This was super helpful for me and for the most part my brows were right on schedule. Since you can’t scrub your brows while washing your face for the first 7-10 days, what I did was take my usual quick shower and then wash my face at the sink afterward. I washed around the brows and used a clean face cloth to make things easier. To wash the brows specifically, I gently patted with baby shampoo or Cetaphil face wash, then rinsed and patted clean and dry with a clean paper towel. My tattoo artist explained that other wash cloths can carry bacteria that we wouldn’t want that getting in all our new little open cuts. I was able to follow with my normal skincare routine without any trouble.

My brows started to peel around day 8. I wasn’t really prepared for the amount of peeling that would happen. Not only did my brows peel, but my whole forehead did as well. I’m not sure if that’s super typical for everyone but they told me it could have been due to the constant wiping from washing my face.

Once the peeling process was done, my brows faded a bit for the next week or so and then miraculously came back. Just like the card indicated. This peeling was present more just for the initial appointment. My brows peeled far less after the touch up.
What Can’t I Do After Microblading?
For 7-10 days you want to avoid:
Sweating – this meant no workouts for me which was the hardest part since I have an active workout routine. Instead, I made sure to get in some stretching, yoga and walking breaks throughout my day using my Peloton app to keep up with my activity.
Sun – you want to avoid the sun as much as possible but if you’re exposed, make sure to have a hat and glasses to keep your brows safe.

Makeup – I wore face makeup still which is fine, but you want to avoid makeup or brow gel specifically on the brows for those days. Also keep in mind washing makeup off your face while trying to avoid getting it on your brows can be a bit tricky. I pared down my makeup routine and wore less foundation than usual in order to keep my face a little less impacted.
I also made sure to sleep on my back so I wasn’t inadvertently putting too much pressure on my brows by laying on my stomach or side.
Microblading Before and After
I LOVE my new brows! Overall, my experience was awesome and I love my micro blading results! What I loved about my artist is she was all about enhancing what I had instead of completely altering the shape which I feel makes it look much more natural. I also loved that she ensured each stroke was natural and hair like.

I didn’t want my brows to look like I had makeup on them constantly as that wouldn’t be natural looking when my face was makeup free. Luckily, I ended up with exactly what I wanted and my brows are structured and visible without makeup but they’re not “all made up” if that makes sense. I still fill them in a tad and add brow gel when I’m wearing makeup for a more structured look. It’s totally not necessary but just a personal preference. I have also had my brows waxed since having them done and that went perfectly.

How Often Do You Have To Get Touched Up?
I was informed that this can be different for everyone depending on your lifestyle, exposure to the sun and other factors. But the typical answer is I can go for touch ups every 18 months to 3 years.
How Much Does Microblading Cost?
This will obviously differ depending on where you go to get your brows done. I paid $600 total plus tip.
Overall, my experience with microblading was great and I would definitely recommend microblading if you’re looking for a low maintenance brow routine. Make sure to do your research and read reviews to find someone you can trust. At the end of the day it is a tattoo on your face after all!


Leave a Reply