The world of makeup can be a bit much, especially when you’re just starting out. Besides all the options for the makeup products themselves, there are SO many brushes and tools to choose from to go along with it. They all seem to serve a different purpose. How are you supposed to know which to choose?! In order to help you figure out the basics you should have in your arsenal, here are my picks for the must have makeup brushes for beginners. Even if you’re not a beginner they’re just good picks all around too (IMO)!

I myself have about 50 different makeup brushes. I know, I know. It’s kind of obnoxious. Like children, they’re all special to me in their own way. 🙂 But I totally get that its unnecessary for most casual makeup users. Maybe you’re just starting out and don’t know which brush is best for which product. Maybe you didn’t even realize there was a world beyond that little eyeshadow applicator that comes with the compact. Or you just prefer simplicity and don’t need or want 80 brushes in your everyday routine. Either way, this list is for you! So I am breaking it down to the top brushes I use for my everyday makeup routine that you NEED (yes I said need) and then a few honorable mentions if you’re wanting to expand a bit.
Most of my brushes are from MAC, Morphe or Real Techniques. Real Techniques products are available at most drugstores. Morphe is sold on their website or Amazon but I have recently seen them at Ulta as well. For the pricier MAC brushes, Morphe does have some very decent equivalents so I will include those as well in case you’re ballin’ on a budget.
Let’s get started shall we?!
FACE
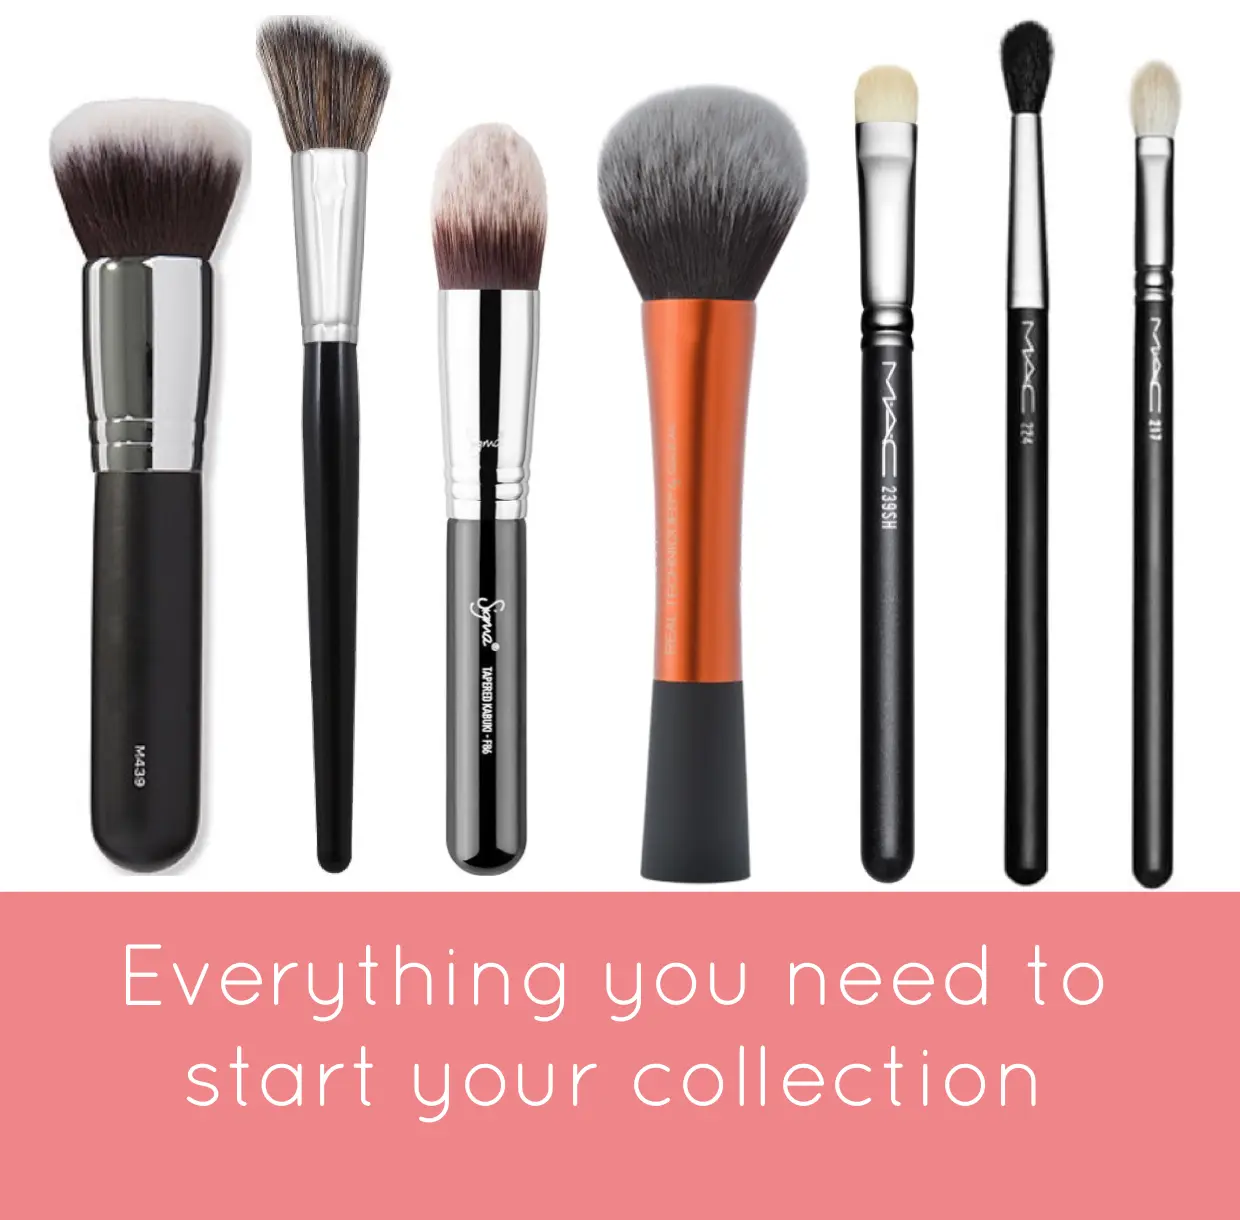
Marc Jacobs The Face II/Morphe M439
I have used several different tools for different types of foundation. Beautyblenders, my fingers, synthetic hair brushes, duo fiber brushes and all things considered, I prefer a synthetic haired brush overall. My favorite foundation brush is my Marc Jacobs The Face II brush. It applies product evenly, doesn’t soak up all the foundation and it blends well. I use it with a stippling motion across my face and just keep going until things look nice and blended. It works great with both super matte foundations, like my all time fave Estee Lauder Double Wear, and with more hydrating or mousse like foundations.
Yes it’s pricey. I bought it at Sephora when I had a 20% off code. I absolutely think it’s worth it BUT, my Morphe M439 Deluxe Buffer does pretty much the exact same thing for a fraction of the cost. Honestly, if I ever lost my Marc Jacobs one I probably would not rush out to replace it knowing I have this guy waiting in my brush holder. I mean, I might cry a little but life would go on. The M439 does a great job of buffing out my foundation and keeping things looking nice and blended.
Pro Tip #1:
Spray your brush with a little setting spray before blending out your foundation. I use MAC Fix+ for this. This helps things to blend even more seamlessly and prevents quicker drying foundations from getting streaky.
Pro Tip #2:
After you’ve applied your foundation, wet a makeup sponge, squeeze out the excess water, and dab it all over your face to blend even further. Again, this helps with my super matte foundations and really blends the product well into my skin and keeps it from looking dry or cakey.
Morphe E4 Elite Angled Contour
When I apply blush, I prefer to use an angled brush to follow the natural shape and hollows of my cheekbones. I use the Morphe E4 Elite Angled Contour brush. It’s super soft and deposits color evenly. Because of the angled shape, it applies exactly where I want it to. When I’ve gone a little blush happy it’s easy to sheer out when I overdo it. This is especially helpful when I’m getting ready in dimly lit areas. Which, oddly enough, happens more often than you’d think.
Pro Tip #3
Instead of swirling your brush in the blush pan, which can pick up too much pigment, use a light swiping motions. This helps your color start small and you can build up to what you’re looking for.
Sigma F86 Tapered Kabuki
I LOVE my real techniques miracle sponge for blending out concealer but most days I use this brush for the simple reason that I don’t always have the extra minute to take my sponge to the bathroom to dampen it. Seriously, those 60 seconds are vital in my busy mornings. The Sigma F86 tapered kabuki is a synthetic haired brush that fits perfectly under my eyes and the tapered end reaches right into the inner corner. It blends out my concealer perfectly. I use it by pushing the brush into my under eye area and then gently dabbing to blend it out toward the outsides of my face. This is one of my favorite brushes that I would definitely run out to replace if I ever lost it.
Real Techniques Flawless Powder Brush
I use powder to set my foundation and I prefer a big fluffy brush to do the job. I use the Real Techniques flawless powder brush for my setting powder. This brush is large and fluffy but still slightly dense so it covers a larger surface area while providing good coverage. When using a smaller or more stiff brush, I get a more full coverage result but the powder can get a little spotty and not as blended without a little more work on my part. With this brush, the powder applies evenly and blends effortlessly. I’ve used several different types of powder brushes but this has been my favorite so far.
EYES
There are 3 main eyeshadow brushes that I would recommend when starting out. A brush for the lid, a fluffy brush for blending out color in your crease and a stiffer crease brush for a more precise deposit of color. If you are a true beginner and you HAD to pick 2 of the 3, you can probably do without the stiffer crease brush. But in my arsenal it’s a necessity. 🙂 Here are the ones I recommend and what they do:
MAC 239 or MAC 242


The MAC 239 and 242 have a flat surface for packing color onto the lid. I prefer the 239 which is a shorter, wider brush over the 242 thinner brush but that’s just personal preference basked on my lid shape. They both work well and get the same job done. I tend to use the 239 when I am working with a more matte shade on the lid and the 242 when I am using a lid color with more sheen to it. A good dupe for the MAC 239 is the Morphe M167.
Pro Tip #4:
Pack color on the lid with a dabbing motion versus a swiping to get the best color pay off
Pro Tip #5:
When using colors with sparkle or shimmer, wet your brush a little for more sheen
MAC 224
This brush is a fluffier brush used to blend out color in the crease. I use this brush to transition my lid color to my crease color. It’s also great for blending out a darker color when you want to lighten it up a bit. Cheaper options for this brush would be either the Morphe MB23 or the M330.
Pro Tip #6:
When blending in the crease with a fluffier brush use an arc-like windshield wiper motion versus small circles or a straight back and forth motion. Keep doing this over and over until there are no obvious lines. And then blend some more. Just in case 🙂
MAC 217
I love the MAC 217 but if you’re a true beginner and the thought of putting more than one color on your eyes freaks you out, you can probably do without this one. I use this to apply more concentrated color to my outer crease. The brush is more dense so it applies the color more precisely than the 224 but it is still soft enough to blend. This brush gives me nice shading in the outer corner of my eye and works well when trying to create a gradient effect from the inner corner to the outer V. The cheaper equivalent to this MAC brush is the Moprhe M433.
Honorable Mentions
(for the intermediate makeup user)
So those above are my major must have brushes to start out your collection. There are a few others that I absolutely love and use on a daily basis. They may not be a necessity for someone just starting out, but I do think they are helpful additions to any brush kit.
Real Techniques Setting Brush
This brush is my holy grail for setting my undereye concealer. It’s super soft with light and fluffy bristles so it distributes the powder evenly and sets my makeup perfectly. This prevents my concealer from settling into fine lines. It’s one step I don’t skip even when I am pressed for time.
Morphe M523 Tapered Powder
I use this brush to apply my bronzer and to do a softer contour on my face. It’s short and dense so it gives my contour some structure but it is also fluffy enough to blend easily so there are no harsh lines. I usually use it right under my cheekbones and around my hairline and nose. I have others I use when I am going for a more structured look or a more lighter dusting of bronzer but this is the one I reach for most often for my everyday look.
Morphe M501 Pointed Blender
This fluffy little guy is a the perfect size to throw a little highlighter right on the tops of the cheekbones. Since it’s smaller, it deposits the highlight to the exact area I want and it blends easily with a light swiping motion.
Pro Tip #7
I use Cinema Secrets Brush Cleanser to clean all my brushes. You can check out how I clean my brushes here.
That’s all folks! There are other brushes I would recommend for more specific and intricate looks but that’s a post for another time. Hopefully this gets your collection up and running in the right direction!
Shop My Fave Brushes!
Some of the links above are affiliate links, and at no additional cost to you, I will earn a small commission if you decide to make a purchase after clicking through the link. The products linked are ones I use personally and wholeheartedly recommend.
Thank you for your continued support!








Leave a Reply