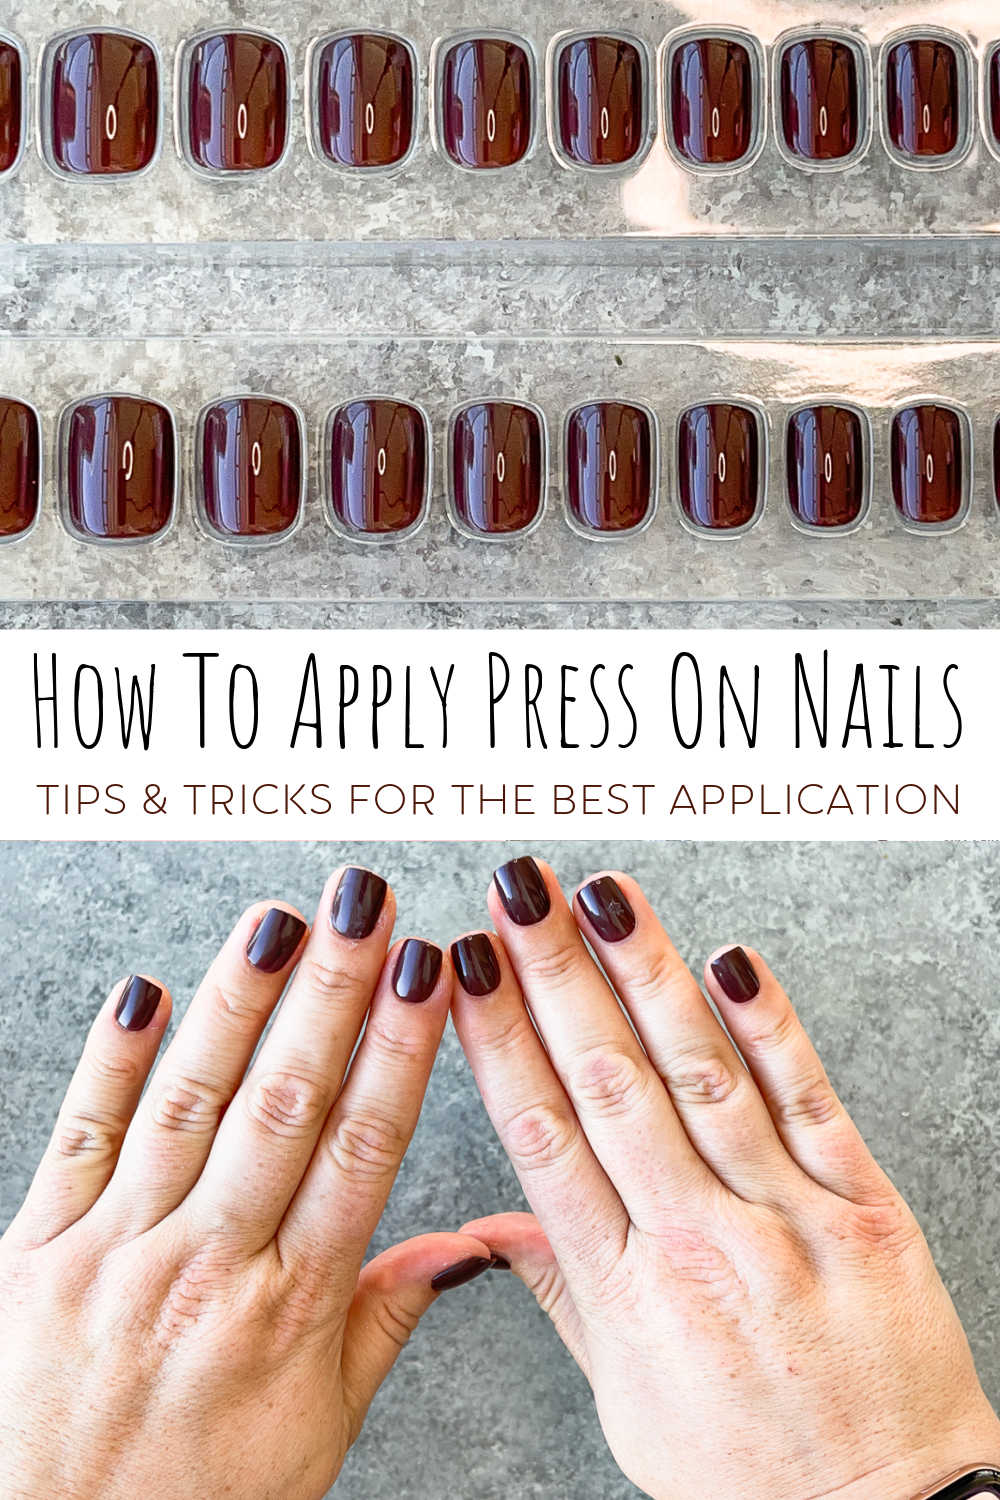
The day has finally come for me to do a full blog post on how to apply press on nails! I had so much fun with my everyday makeup pictorial that I thought I would do another for these press on nails. I talk about this on my Instagram account all the time, but now all my tips and tricks will be in one place. I am OBSESSED with press on nails. They’re quick. They’re easy (once you get the hang of it) and they look just like the real thing. I prefer them over regular polish since regular polish lasts all of 3 minutes on me before I chip it somehow. Press on nails are also better than gels in my opinion. No spending $40 on a gel manicure or having to go to the salon every few weeks. Hopefully this tutorial will help guide you how to apply press on nails for a salon look for much cheaper!

Which Press On Nails Are the Best?
I have a few brands that I LOVE out of all the ones I’ve tested. One is the Kiss Nails brand. You can find these all over drugstores and places like Target, and Ulta. They are everywhere. This brand also makes a type called Impress Nails but those ones are not my favorite. The Impress ones tend to pop up easier due to the adhesive and my hair gets stuck underneath a lot which I don’t love.
When I get Kiss Nails, I specifically get the ones without adhesive on them. They adhere to my nail better and lay flush to my nail bed which creates a more natural look and in my experience, lasts longer.

Another brand that I swear by is Static Nails. These ones are a little pricier than the Kiss Nails but I find they are a bit longer lasting. They also claim they can be re-worn if popped off correctly. I haven’t tried that yet but I will update this when I do! They have an amazing color selection and look so natural! PS: I reached out to them and they offered me an affiliate code! “JENLOPEZ10” will get you a discount on their site!

Another option I really love is the OPI Press on Nails. For all the press on nail brands I like, I go for the square shaped, shorter nails. Both Kiss and Static Nails have other options like oval, coffin, or almond nails but I typically prefer the shortest possible. But it’s good to know there is something for everyone.
Do Press On Nails Damage Your Nails?
Obviously there will be a little bit of damage as you are putting glue on your nail beds. But it is nowhere NEAR the damage I used to experience when doing gel manicures. My nails are not thin and weak after press on nails and once I file off any excess glue, they are relatively back to normal! I am usually able to go from one set to another without any issues.
If I do give my nails some time to breathe I just pop on some OPI Nail Envy in between sets.
Now that we got that out of the way, let’s move on to this tutorial on how to apply press on nails shall we?
Step 1 – Prep Your Nails
First things first, I prep my natural nails. To start, I have the following tools handy:
- Nail Polish Remover
- Cuticle Clippers
- Nail File or Emery Board
- Cuticle Pusher Stick or Wood Cuticle Stick
- Small bowl with warm water

Let me just say all these tools and this preparatory step isn’t 100% necessary and in a pinch, I have totally just popped on some nails real quick without doing it. But I will say these steps help the press on nails last longer and look more natural.
I start by soaking my nails in some warm water for a few minutes to soften up the cuticles. Then I push them back using a cuticle pushing stick or a wooden cuticle stick. Next, I clip the excess cuticles with a nail clipper.


Once that’s done I will cut or file my nails down to the size and shape I want and then swipe on some nail polish remover to clear off any additional oils left on my nail beds.


Once that’s complete your nails are prepped and ready to go.
Step 2 – Choose Your Press On Nail Sizes
Press on nail kits came with an array of shapes and sizes to fit different nail beds. Through lots of trial and error I have found that press on nail sizes that are JUST a fraction smaller than my natural nail bed work the best. In the pics below you can see the difference between a good size nail on the left and a too big nail on the right.


When I find one that fits exactly, they tend to look a little big on the nail bed and in turn, more fake. They also tend to pop off easier if they are too big. When I choose a size a bit smaller, it mimics the small spaces left when you apply normal nail polish and hence, looks most natural on me. It’s my personal preference and I find it works really well for me. You also don’t want to go TOO small either. It’s a delicate balance but hopefully these pictures can help you see what I mean.

Pro Tip: most press on nail kits have teeny tiny numbers printed on the under side of the nail with the size written out on it. You can use this as a guide when finding the right fit for your left and right hand. Sometimes they don’t match between both hands exactly since each finger can be a little different but it’s a good way to get close to the right size for each side.
Step 3 – Apply Press On Nails
Once you have your nail sizes picked out and set in front of you in order, it’s time to apply the press on nails.

I use the glue that comes with the kit and apply a small drop on both the press on nail and my natural nail. Next, hold the nail straight and lay it on your natural nail bed right above your cuticle line. You do NOT want the press on nail to be glued onto your cuticles!


Once you have everything aligned, press gently and hold the nail down to your nail bed for 10-20 seconds until it is firmly in place. I then use a cotton pad to clear off any excess glue around the sides of the nail. I also pull my finger pad back a bit while the glue is drying to make sure my finger pad does not get glued to the nail. I’ve learned my lesson after doing that so many times when I first started. It’s such a pain (literally and figuratively) to pull it apart once the glue dries.

Continue this process for the rest of your fingers until they are all complete.
Step 4 – Clean Up!
Once all the press on nails are in place, I do a little clean up. I find that this part helps them look even more natural. I file them a bit so they match the natural shape of my nails and then remove any excess glue under the nails or the surrounding area with the clippers.


Wash your hands and then you are set! My press on sets, especially the Static Nails, last me 12-14 days without any problems. If something happens and one does pop off, simply file down the old glue on your natural nail and glue it right back on.
How To Remove Press On Nails?
For the Static Nails, after about 10-14 days I apply a little pressure at the corner of the nail near the cuticle and then I am able to just pop them off. I have saved old sets for re-use and they look totally fine. Once I actually attempt to re-use I will update this post!
Hopefully this post on how to apply press on nails has been helpful! If you have any questions or any other tips to share, feel free to leave them below!


Leave a Reply